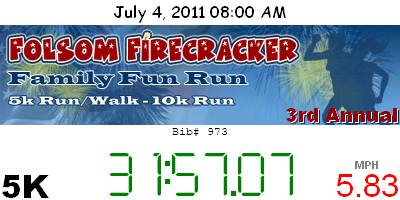
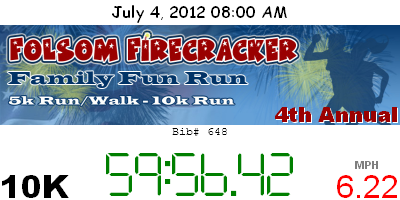
For each race I compete in, I create a "badge" image as a memento to record my participation. I think they make for a nice way to look back on the runs I did, and an easy way to look back on the history of my personal records. Below are the steps I take to make the badges. If you wish to make your own badges, feel free to copy these steps exactly or make alterations as you wish.
Before getting started, you will need a couple of things. First off, you will need image editing software. I use a free software program called Paint .NET. Additionally, I use a font called "LED Font" for my race time:

I'm not 100% where I downloaded the font. The file is called LEDFont.ttf. It looks like it could be the one downloadable here or here. Alternatively, you could use a different font.
Once those two items are addressed, here's what to do:
- Launch Paint.NET.
- Create a new image with a width of 400 and a height of 200.
- Change the current tool to the "Text" tool.
- Change the font to “"Comic Sans MS", font size to "12", font color to "black", and text align to "center".
- Locate the cursor at (200, 12).
- Type the date and time of the race in "MMMM d, yyyy hh:mm tt" format. For example, if I ran a race this morning at 9, I'd type "November 7, 2012 09:00 AM".
- Download the logo for the race (if it exists).
- Resize the logo to be no bigger than 400x100.
- Copy and paste the logo centered on the image with the top at height 25.
- If the logo lacks an identifier of the year (i.e. "3rd Annual") feel free to add one if possible. I find doing this helps distinguish between badges for races that use the same logo from year to year:
- If there is no logo, create a text logo to fill this space.
- Change the drawing type to "Text".
- Change the font to "Courier New" and font size to "8".
- Locate the cursor at (200, 131).
- Type "Bib# " and the number of your bib.
- Change the font to “Arial Black”, font size to “24”, and text align to “left”.
- Locate the cursor at (1, 186).
- Type the distance of the race (i.e. "5K").
- The goal is to have 2 pixels between the text and the left and bottom borders. Move the text such that this is the case.
- Change the font to "Arial", font color to “red”, and text align to "right".
- Locate the cursor at (399, 187).
- Type in your average speed in MPH for the race. You could alternatively do average pace (minutes/mile). I'm not completely sure why, but I do seem to prefer MPH.
- Change the font size to "8", font weight to "bold", font color to "7f7f7f", and text align to "center".
- Locate the cursor at (x, 165) where x is the midway point between the leftmost point of the speed text and 397 (which should be the rightmost point). Usually I find the leftmost point to be at 337, so x would be 367.
- Type "MPH". Instead type "Pace" if you choose to do average pace.
- Change the font to "LEDFont", font size to "48", font weight to "normal", and font color to "007f00".
- Locate the cursor at (200, 180).
- Type in your chip time for the race. If there is a "1" in the time, I type a "7" (to keep things spaced nicely), I then erase the top line of the "7", and paste a "1" over it.
What the time looks like with 1s:

Same time but with 7s:

Erase the tops of the 7s:

Paste 1s over what's left of the 7s:

The easiest way to accomplish that final part is to type a 1 anywhere on the image and drag it into place.


And that's all there is to it. Hopefully that's clear enough. If not, feel free to leave comments below, and I'll try to help you out and hopefully be able to improve these instructions.


No comments:
Post a Comment